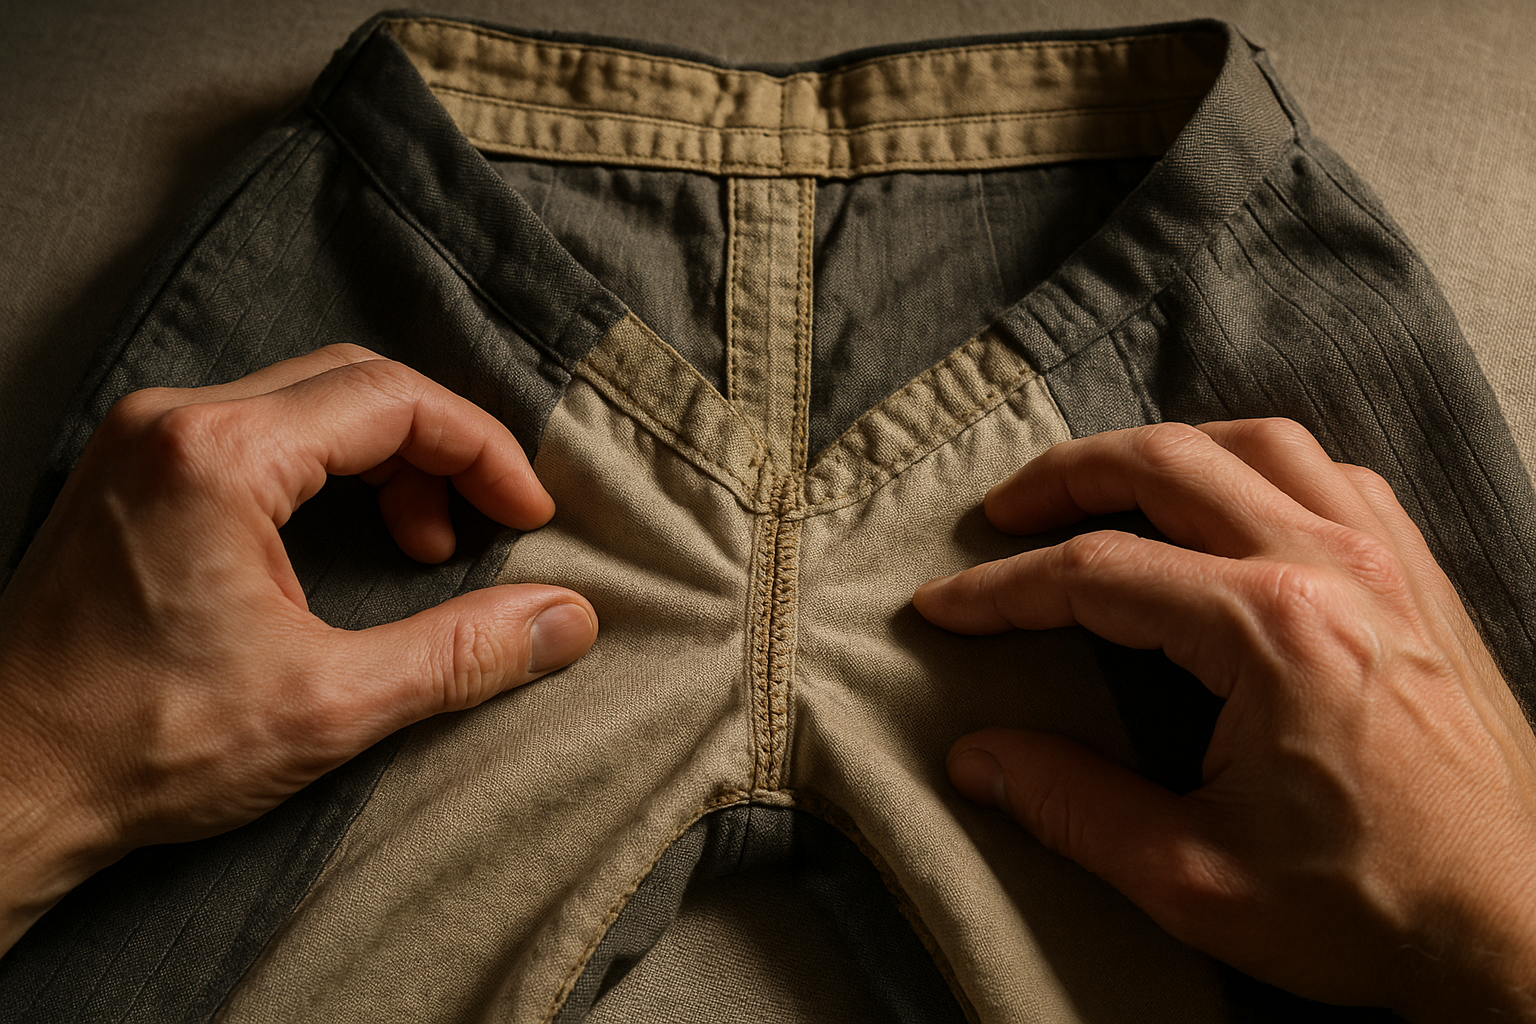
To grade hidden seam stress on vintage pants, turn the garment inside out and inspect the seam allowance itself — not the visible stitch line — at the crotch, inseam, back rise, and waistband attachment. Fraying, elongated stitch holes, or gapping between the allowance and the stitch line signal structural stress that a pressed, intact outer seam will never show you.
We've graded pants that photographed Excellent from the outside and failed at the first wear. The seam looked straight, the stitching looked even, nothing was puckered. Then the buyer sat down and the inseam let go two inches below the crotch. The defect wasn't on the surface. It was inside the allowance, where the fabric had been thinning against the stitch line for who knows how many wears before we ever touched the garment. That's the failure mode this test exists to catch.
Why Hidden Seam Stress Gets Missed
Most condition checks on trousers stop at the outside: fabric wear, fading, pressing, whether the seam line itself looks straight. That catches cosmetic issues. It does not catch structural ones, because a seam can look fine from the outside right up until it fails, especially on garments that have been sitting folded for decades.
Seam allowance — the fabric folded inside the seam beyond the stitch line, typically 5/8" to 1" on tailored trousers — is where stress accumulates first. It's under constant lateral tension every time the wearer sits, bends, or crosses their legs, and unlike the visible seam, nobody presses it, nobody looks at it, and nobody accounts for it in a standard front-and-back listing photo. On vintage pants specifically, this matters more than on new stock for three reasons:
- Older synthetic and natural-fiber blends lose tensile strength unevenly, so the allowance can be brittle even when the outer fabric still looks intact.
- Many vintage trousers were finished without an overlock or serged edge, so the allowance was already prone to fraying from the day they were made — decades of wear accelerates that baseline weakness.
- Vintage pants get altered more often than new ones. A previous tailoring job can leave a narrower allowance than the garment was built for, which reduces the margin before a stressed seam has nowhere left to give.
What the Seam Allowance Actually Tells You
The allowance is a stress log. Every time a seam is pulled — sitting down in a snug rise, bending at the knee, stretching to reach for something — the load travels through the stitch line into the allowance fabric on either side. If the fabric is sound, it absorbs that load and returns to shape. If it's fatigued, you'll see the evidence in three specific places:
- At the stitch holes themselves, which enlarge and elongate under repeated stress instead of staying tight and round.
- Along the raw or finished edge of the allowance, where fraying starts and works inward toward the stitch line.
- In the gap between the allowance and the stitch line, where sound fabric lies flat against the seam and fatigued fabric pulls slightly away, creating a visible pucker or bubble when you spread the seam open.
None of this is visible with the pants right-side out and laid flat for a listing photo. You have to go inside.
The Seam Allowance Test: Step-by-Step
This takes about three minutes per pair once you've done it a few times. Do it before you shoot photos, not after — if you find a stress point, it changes what you photograph and how you grade.
- Turn the pants inside out and lay them flat under strong, direct light. Overhead room light will hide fraying; a raking light angled across the seam will not.
- Locate the four highest-stress seams: crotch seam, inseam (particularly the lower third near the knee and the upper third near the rise), back rise seam, and the waistband-to-body attachment seam.
- At each location, gently spread the seam allowance open with your thumbs, exposing the stitch line and the fabric on either side of it. Do not pull hard — you're checking condition, not stress-testing to failure.
- Inspect the stitch holes under light. Round, tight holes with thread sitting snugly in the weave are sound. Elongated or oval holes, or holes where you can see daylight through the fabric, indicate the stitching has been working loose under repeated tension.
- Run a fingertip along the raw edge of the allowance. Sound fabric feels continuous. Fatigued fabric sheds fibers, feels frayed at the touch, or has visibly shortened width compared to the rest of the seam.
- Apply light lateral tension across the seam — the same motion as testing for seam slippage — and watch the allowance, not the stitch line. If the allowance fabric bunches, gaps, or separates from the stitching before the stitch line itself shows movement, that's a stress point failing from the inside out.
- Repeat at all four locations and log which ones show elongated stitch holes, fraying, or gapping. This becomes the basis for your Structural Integrity score and your condition report notes.
Five Stress Points on Vintage Dress Pants
Not every seam on a pair of trousers carries the same load. Grade these five locations specifically — they account for the overwhelming majority of seam-related failures we see in returns.
| Stress Point | What Causes the Load | What to Look For |
|---|---|---|
| Crotch seam | Sitting, bending, walking — constant multi-directional tension | Elongated stitch holes, allowance thinning, any prior repair stitching |
| Lower inseam (near knee) | Repeated flexing when walking or sitting cross-legged | Fraying at the allowance edge, fabric shine bleeding into the seam line |
| Upper inseam / rise junction | Where the crotch seam meets the inseam — a structural junction point | Puckering, gapping, or a visibly narrower allowance than elsewhere on the same seam |
| Back rise seam | Direct load-bearing seam when seated | Stretched stitch holes, allowance pulling away from the stitch line |
| Waistband attachment | Constant tension from wear, plus historical alterations | Uneven allowance width (a sign of prior tailoring), fraying at the attachment line |
Grading Thresholds: What Each Tier Requires
Use these findings to set the Structural Integrity component of your grade, then let the overall score reflect whichever factor pulls hardest. A garment with pristine Fabric Condition and Cosmetic Appearance still cannot grade Excellent if the crotch seam allowance is fraying toward the stitch line.
| Grade Tier | Seam Allowance Condition | Wearability |
|---|---|---|
| Excellent (8) | Allowance intact at all stress points, stitch holes tight and round, no visible fraying under raking light | Full confidence in structural durability under normal wear |
| Very Good (7) | Minor thread pulling or slight fraying at one stress point, allowance still fully attached | Sound for normal wear; disclose the specific location |
| Good (6) | Fraying present at one or more stress points, some stitch hole elongation, no active gapping | Wearable but should be disclosed as a defect, not a cosmetic note |
| Fair (5) | Visible gapping between allowance and stitch line at a load-bearing seam, or fraying at multiple points | Structural risk under normal wear; disclose plainly and price accordingly |
| Poor (3–4) | Allowance separated or torn at a stress point, stitching pulled loose, active failure in progress | Not reliably wearable without repair; grade and disclose as a functional defect |
How This Maps to the Five Grading Factors
Seam allowance findings land primarily under Structural Integrity — this is a construction and durability issue, not a surface flaw. But it interacts with the other four factors, and a standardized report should show that interaction rather than flattening it into one line item:
- Fabric Condition — if the allowance fraying stems from general fiber degradation rather than isolated stress, note both. Brittle fabric at the seam and brittle fabric across the garment are related but not identical findings.
- Structural Integrity — the primary factor. Elongated stitch holes, gapping, and fraying at load-bearing seams all score here.
- Cosmetic Appearance — unaffected unless the stress point has caused visible puckering or distortion on the outer seam line.
- Functional Elements — if the stress point is severe enough to affect actual wearability (a crotch seam close to failure, for instance), it crosses into functional territory and should be flagged as such, not buried as a cosmetic note.
- Odor & Cleanliness — unrelated, but worth checking the allowance fold for trapped odor or staining while you're already inside the garment.
Buyers who see a grade of Very Good with a note reading "minor allowance fraying at lower inseam, fully sound" are far less likely to open a dispute than buyers who discover a seam issue after the pants arrive and nobody mentioned it. That's the entire point of grading the inside of the garment, not just the outside.
Try It on One Pair
Pull a pair of vintage dress pants from your current inventory — ideally one you've already graded Excellent or Very Good — and run the seam allowance test at all four stress points before you finalize the listing. If you find something, it's worth knowing before a buyer does. Run the same pair through GradeThread and compare your inside-seam findings against the AI condition report: same five factors, same tier vocabulary, one more layer of consistency between what you see and what you disclose.